Friday, March 4, 2016

Time to Make a Bodice continued......

Okay so now I've finished all the sewing on the bodice and now all that's left are the final touches of beading etc.


I always make my own piping as that way I can control the width and get exactly what I want. 


I used piping in the same fabric as the bodice for the waist but on the top edge, I used plain satin. I did this because this fabric is a bit scratchy so would be very uncomfortable for the dancer. The top edge will be covered with trim anyway so you won't see it. 


Hook and eye tape on. 


All the hand stitching is now done and all it needs now is a final fitting to check the piping before finishing the neckline.


Monday, February 29, 2016

Time to Make a Bodice

The bodice is progressing nicely as you can see.


I only use plastic boning or if I can spiral boning. Always make sure you round off the corners to stop it sticking into the wearer. 


This boning is quite narrow so I'm using the seam allowance on the front panel to create the casing for it. On the other seams I will use a different method. 


It means there is a stitching line on the front but it will be covered by the trim. 


All sewn and pressed, ready for fitting. 


I haven't pressed the side seams as this is where I will adjust it if required. 


I popped it on the dummy so I could have a play with where the trim might go. I can't do much more until Miss A gets home and I can fit it on her. 

Sunday, February 28, 2016

Time to Make a Bodice

So it's time to make the bodice that will go with the black tutu I made. Even though I was happy with the tutu pattern from www.tutupatterns.com I decided to try the bodice pattern from, Tutus That Dance so I could compare the quality and the pros and cons of each pattern. I've made quite a few bodices in my time so I didn't bother purchasing the instructions. I ended up getting the pattern printed out at Officeworks on a large piece paper which saved having to tape it together. I had the same sizing problem with this one due to my daughter being between the youth and adult sizes. The only downside of this pattern is, measurements are only in imperial not metric. I still find it surprising that there are still countries who use imperial, as it's just not as accurate as metric.
I started with a cotton toile which fitted quite well but needed to shorten the pattern and removed some of the bust shaping. Once this was done I transferred the adjustments to the paper pattern and was ready to go.

The Bodice


I found this beautiful silk jacquard at The Fabric Store . It looks grey in this photo but it's black with lurex thread so it has a lovely shimmer. 


I picked up this gorgeous rhinestone ribbon from, Darn Cheap Fabrics and I'll use it for the trim. 


Before cutting I backed my fabric onto woven fusible interfacing.


I made sure I kept enough fabric for the hip basque of the tutu. I'm not sure if I will use it but I want to make sure I have the option. 


Top fabric cut and ready for backing. 


I always mount my bodices onto washed calico. You can use more expensive backing fabric but I find this works well and is comfortable for the wearer. Once it's pinned on I cut it out and stitch it together.


I'm a bit lazy and often don't bother tacking the top fabric and calico together. I just pin it and overlock it together taking the pins out as I go. 


When I'm feeling really lazy or in a hurry, I don't even cut it out properly, I just cut it out quickly and trim off the excess with the overlocker. I wouldn't suggest you do this unless you are very experienced and have very good machining skills. You have to watch out for pins and it works best on pieces with smooth, long curves.  You also have to make sure your tension on your overlocker is spot on. 


All overlocked together and ready to go. 


For the tutu plate, I'm using this silver and black lurex lace so I'm also using that in the centre panel. As you can see the design of the lace is not symmetrical so I will have to do some applique to help make it work. It may not need it with the rhinestone trim, I'll just have to see. 

Stay tuned for the next part of the bodice.


Friday, February 26, 2016

The Most Amazing Artist

I just had to share the work of this wonderful artist. Her photography is just amazing.
Pippa Samaya 
I first came across her wonderful photography last year when she shot a show called, Caught Yellow Handed by Yellow Wheel. She has such a talent for capturing the beauty and emotion of dance.


Tuesday, February 23, 2016

Oh God, I Decided to Make a Tutu!

I've made many types of costumes in my past life as a costume maker, but one thing I never made was a classical or pancake tutu. I'd seen them being made when I was working for the ballet many years ago but never had a chance to make one. That job was left to two very talented women whose one and only job was to make tutus. And make them they did, in what seemed to be an amazing feat of engineering and patience. Well, it was my turn to test both my patience and engineering skills.
I looked the length and breadth of the internet, Pinterest became my friend and my main source of inspiration and information. I gathered my information, looked at reviews of patterns and finally decided to go for a tutu pattern and instructions from www.tutupatterns.com.  It was pancake Tutu pattern 200 for a non-stretch tutu.  Sizing was a little bit of an issue because my daughter was between the adult and youth sizing. I went for the adult sizing and everything was just a little too long in the body for her but with my patternmaking skills, I was easily able to adjust it for her.
I also decided to use power net rather than a woven fabric for the pant and used a satin with a cotton lining for the basque.
The pattern instructions are very well written with clear diagrams, most people would be able to follow it easily. The other plus for this pattern is, measurements are given in both metric and imperial. I got the downloadable pattern which did mean quite a bit of tape to get it all together but it was good to be able to get it straight away.
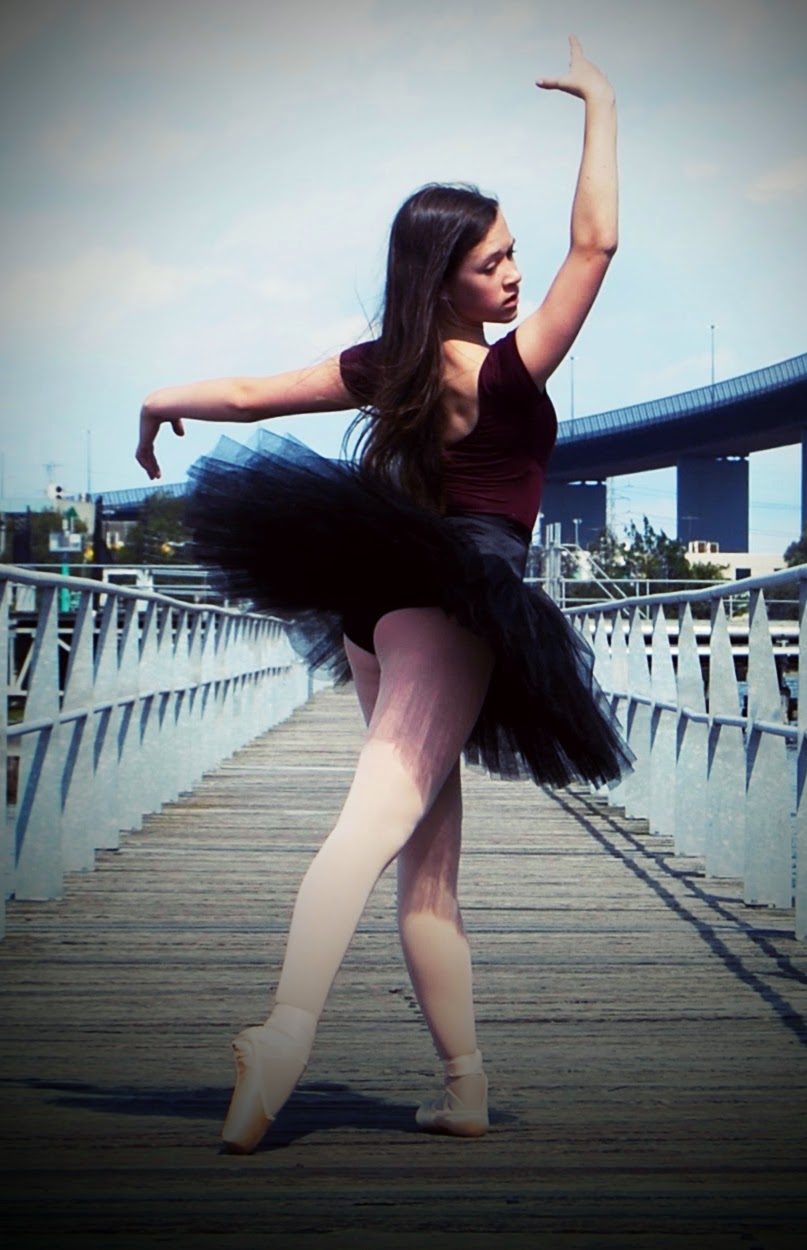
All in all, a test of patience and at times frustrating but well worth it. My, not so little, dancer loves it and I may even make another one.

If you have any questions feel free to ask and I'll do my best to answer them.

The Tutu

I used beige power net on the inside with black on the outside and hand tacked the two layers together before stitching through all sewing lines. 


I completely finished the pant before going onto the basque.


I followed the pattern instructions exactly for the basque but next time I would make the hip part looser as it gets smaller when the net and pant is attached.


I used a rotary cutter for the net, which made the cutting really fast and easy. A must have for tutu making. I made sure I labeled each layer.


With the lower layers, I didn't seam them, just overlapped them as they went on. I gathered each one separately for each layer then stitched it on before going on to the next layer. I opted for the zig zagging over buttonhole thread for gathering. I pulled the thread up as I went which made it faster. 


I alternated the direction for each layer as it went on. One facing up and one facing down.


Butt ruffles done!


Now for the serious job of getting this net on. I was buried behind a sea of scratchy net that seemed to have a mind of its own. 


I didn't do much pinning but as it got more unmanageable with each layer I did start using them near the end.


It really did look like a giant black Chrysanthemum when I had all the layers on. 


I pinned and hand tacked the basque to the pant and net because it was just so hard to handle. Even with doing this I had to unpick a couple of times before it was perfect. 


Once this was done I machined on the outside in the ditch and then hand stitched the inside seam. 


After a couple of days rest to recover from the net nightmare it was time to tack. I used the tacking method in the instructions which seemed to work quite well. 


I did steam the layers lightly as I went which helped (I think).


All tacked and ready for finishing. 


All Finished!


Monday, February 22, 2016

I'm Back!

I haven't done anything with this in a couple of years but perhaps now is the time to revisit this. I've been doing less knitting and more costume making, my first love.  Being the mother of a dancer I've always had to make the odd costume but of late I've decided to use it as a chance to increase my costume making and design skills. I did work professionally as a costume maker prior to having children so I have some very strong sewing skills to begin with, but we can always learn new things. To that end, I've trawled the internet to find the information I needed to acquire those new skills, sometimes with success other times, not so much.
One of the new skills I taught myself was making a classical tutu. I've decided to share that journey and what did and didn't work.
Here's just a taste of the finished tutu skirt but the bodice is yet to come.
Hopefully, what I share will help and inspire others.


Saturday, March 29, 2014

365 Days of Being Grateful - Day 59

Today I'm grateful for; my beautiful little dancer. She is full of grace and beauty and I love her.